
I had been using an Intel Core i7-8700K since October 2017, patiently waiting for a good opportunity to upgrade. Fed up of waiting, I ordered some new parts:
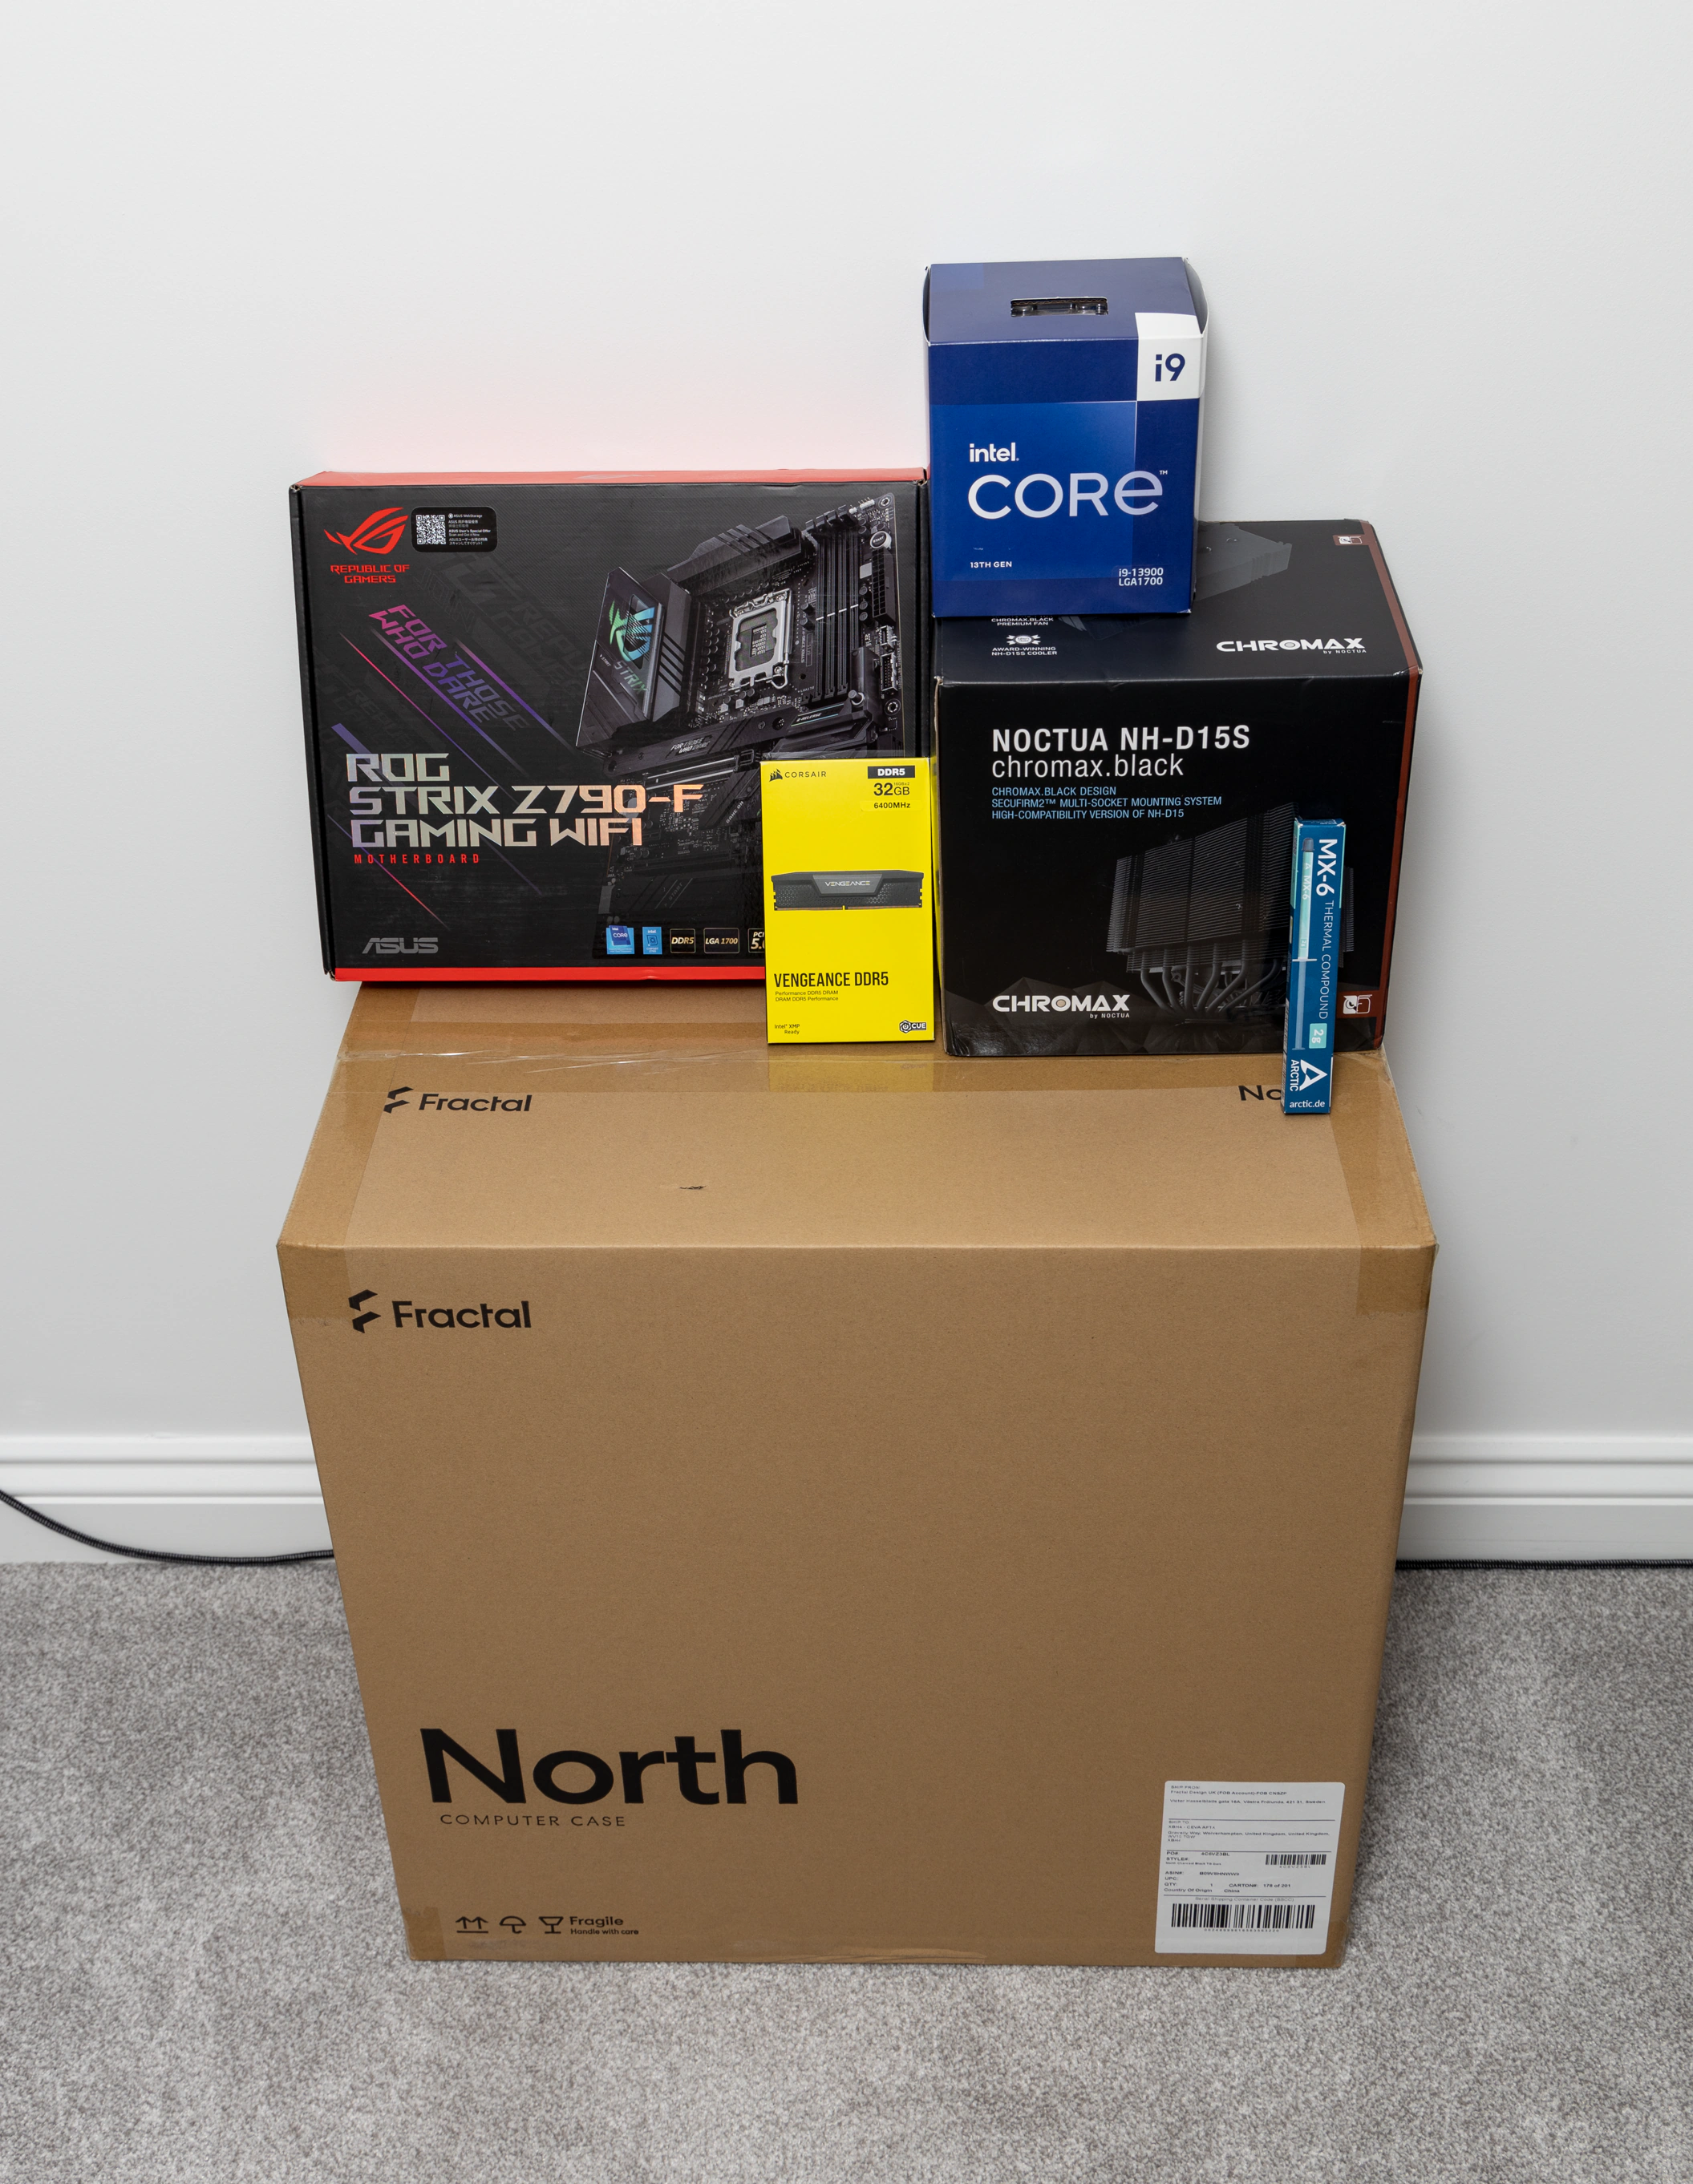
The exact parts (along with the prices I paid, inclusive of 20% UK VAT) are:
- Intel Core i9-13900 (non-K) (£452)
- Asus ROG STRIX Z790-F GAMING WIFI (£389)
- Corsair Vengeance 2x16GB 6400MT/s C32 (CMK32GX5M2B6400C32) (£125)
- Noctua NH-D15S chromax.black (£90)
- Fractal Design North Tempered Glass Black (£130)
- Arctic MX-6 (£6)
I put a little bit of effort into getting some good deals, so it took a couple of weeks to get everything. (The case being the main exception on price, as it’s almost impossible to get hold of.)
More on the new parts
Intel Core i9-13900
I wanted a Ryzen 9 7950X. It has better performance per watt, and I’d rather have 16 full-fat cores than a mix of performance and efficient cores. What put me off, though, were some of the problems I’ve seen reported with the AM5 platform. I don’t want long boot times and a rubbish memory controller – I want a PC that just works and I can depend on. So I settled for Raptor Lake. (I’m sure AM5 will get better in time, though.)
To K or not to K?
I got an 13900 rather than an 13900K because:
- it was cheaper (in my case)
- I have no interest in having a furnace for a PC
Getting an 13900 was a bit of an unknown, because there are no reviews of the non-K model. I intended to manually set the processor’s power limits to figures that suit me, so I had a look at benchmarks of the 13900K at lower power limits and Geekbench scores for the 13900 to help with the decision.
Asus ROG STRIX Z790-F GAMING WIFI
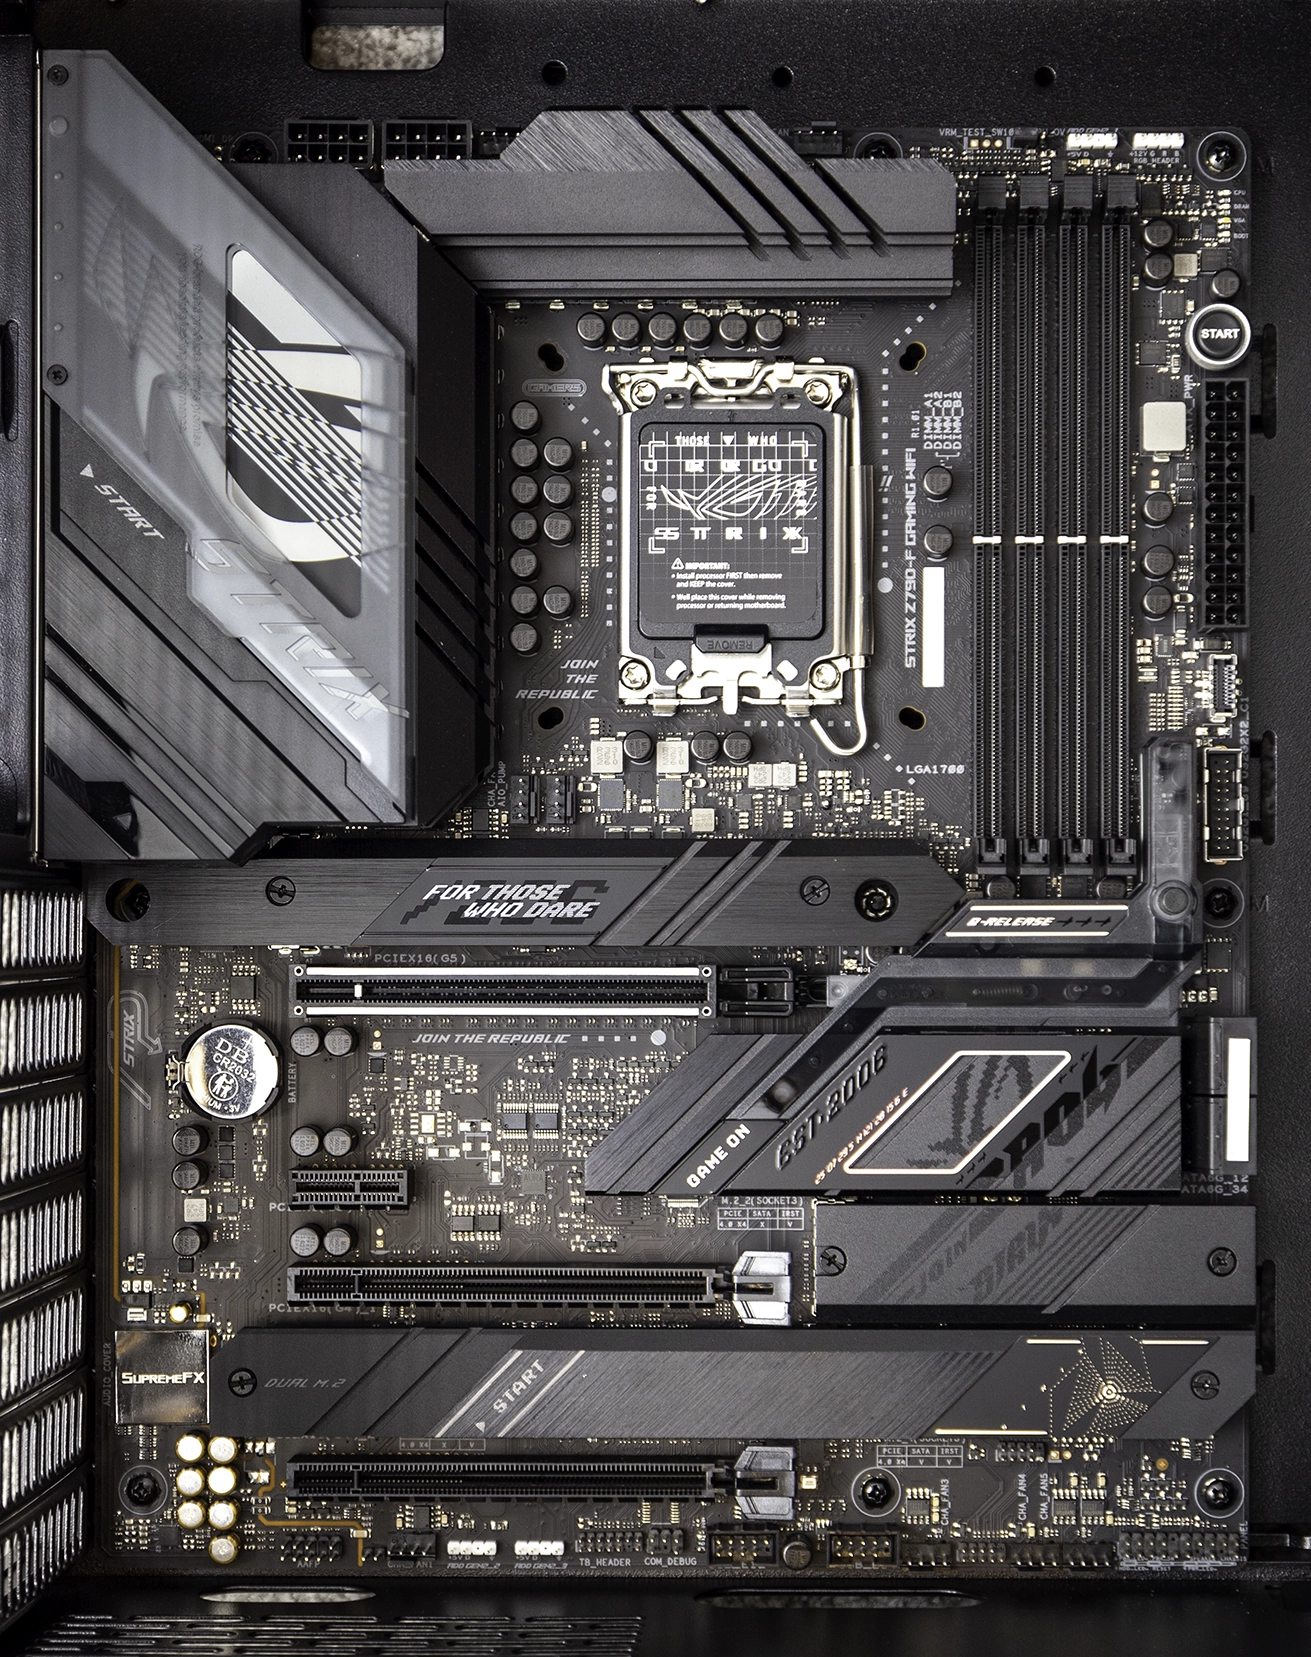
My last five motherboards have been Asus models, so I thought I’d stick with what I know. The last two were from the Asus Maximus Hero line, so I looked there first. What I saw, though, is that the Maximus Z790 Hero is more than double what I paid for my last board, the Maximus X Hero (Wi-Fi AC). It’s hard to justify spending that much on a motherboard (more so when most of the extra features are things that I don’t need). So I settled for a cheaper STRIX model, the STRIX Z790-F. (I actually first ordered the STRIX Z790-H for £309, but the retailer I ordered it from decided they didn’t have them and cancelled my order.)
Corsair Vengeance 2x16GB 6400MT/s C32 (CMK32GX5M2B6400C32)
I was picking between 2x16GB and 2x32GB. But 2x32GB was more than double the price of 2x16GB, making the decision a no-brainer. The Corsair DIMMs I received contain Hynix A-Die integrated circuits (ICs) (identified by the version number, 5.43.01).
Noctua NH-D15S chromax.black
I went for the Noctua, as I wasn’t keen on a liquid cooler. I got an NH-D15S rather than an NH-D15 simply because I didn’t want two fans, and so I thought I’d save a little bit on the price instead.
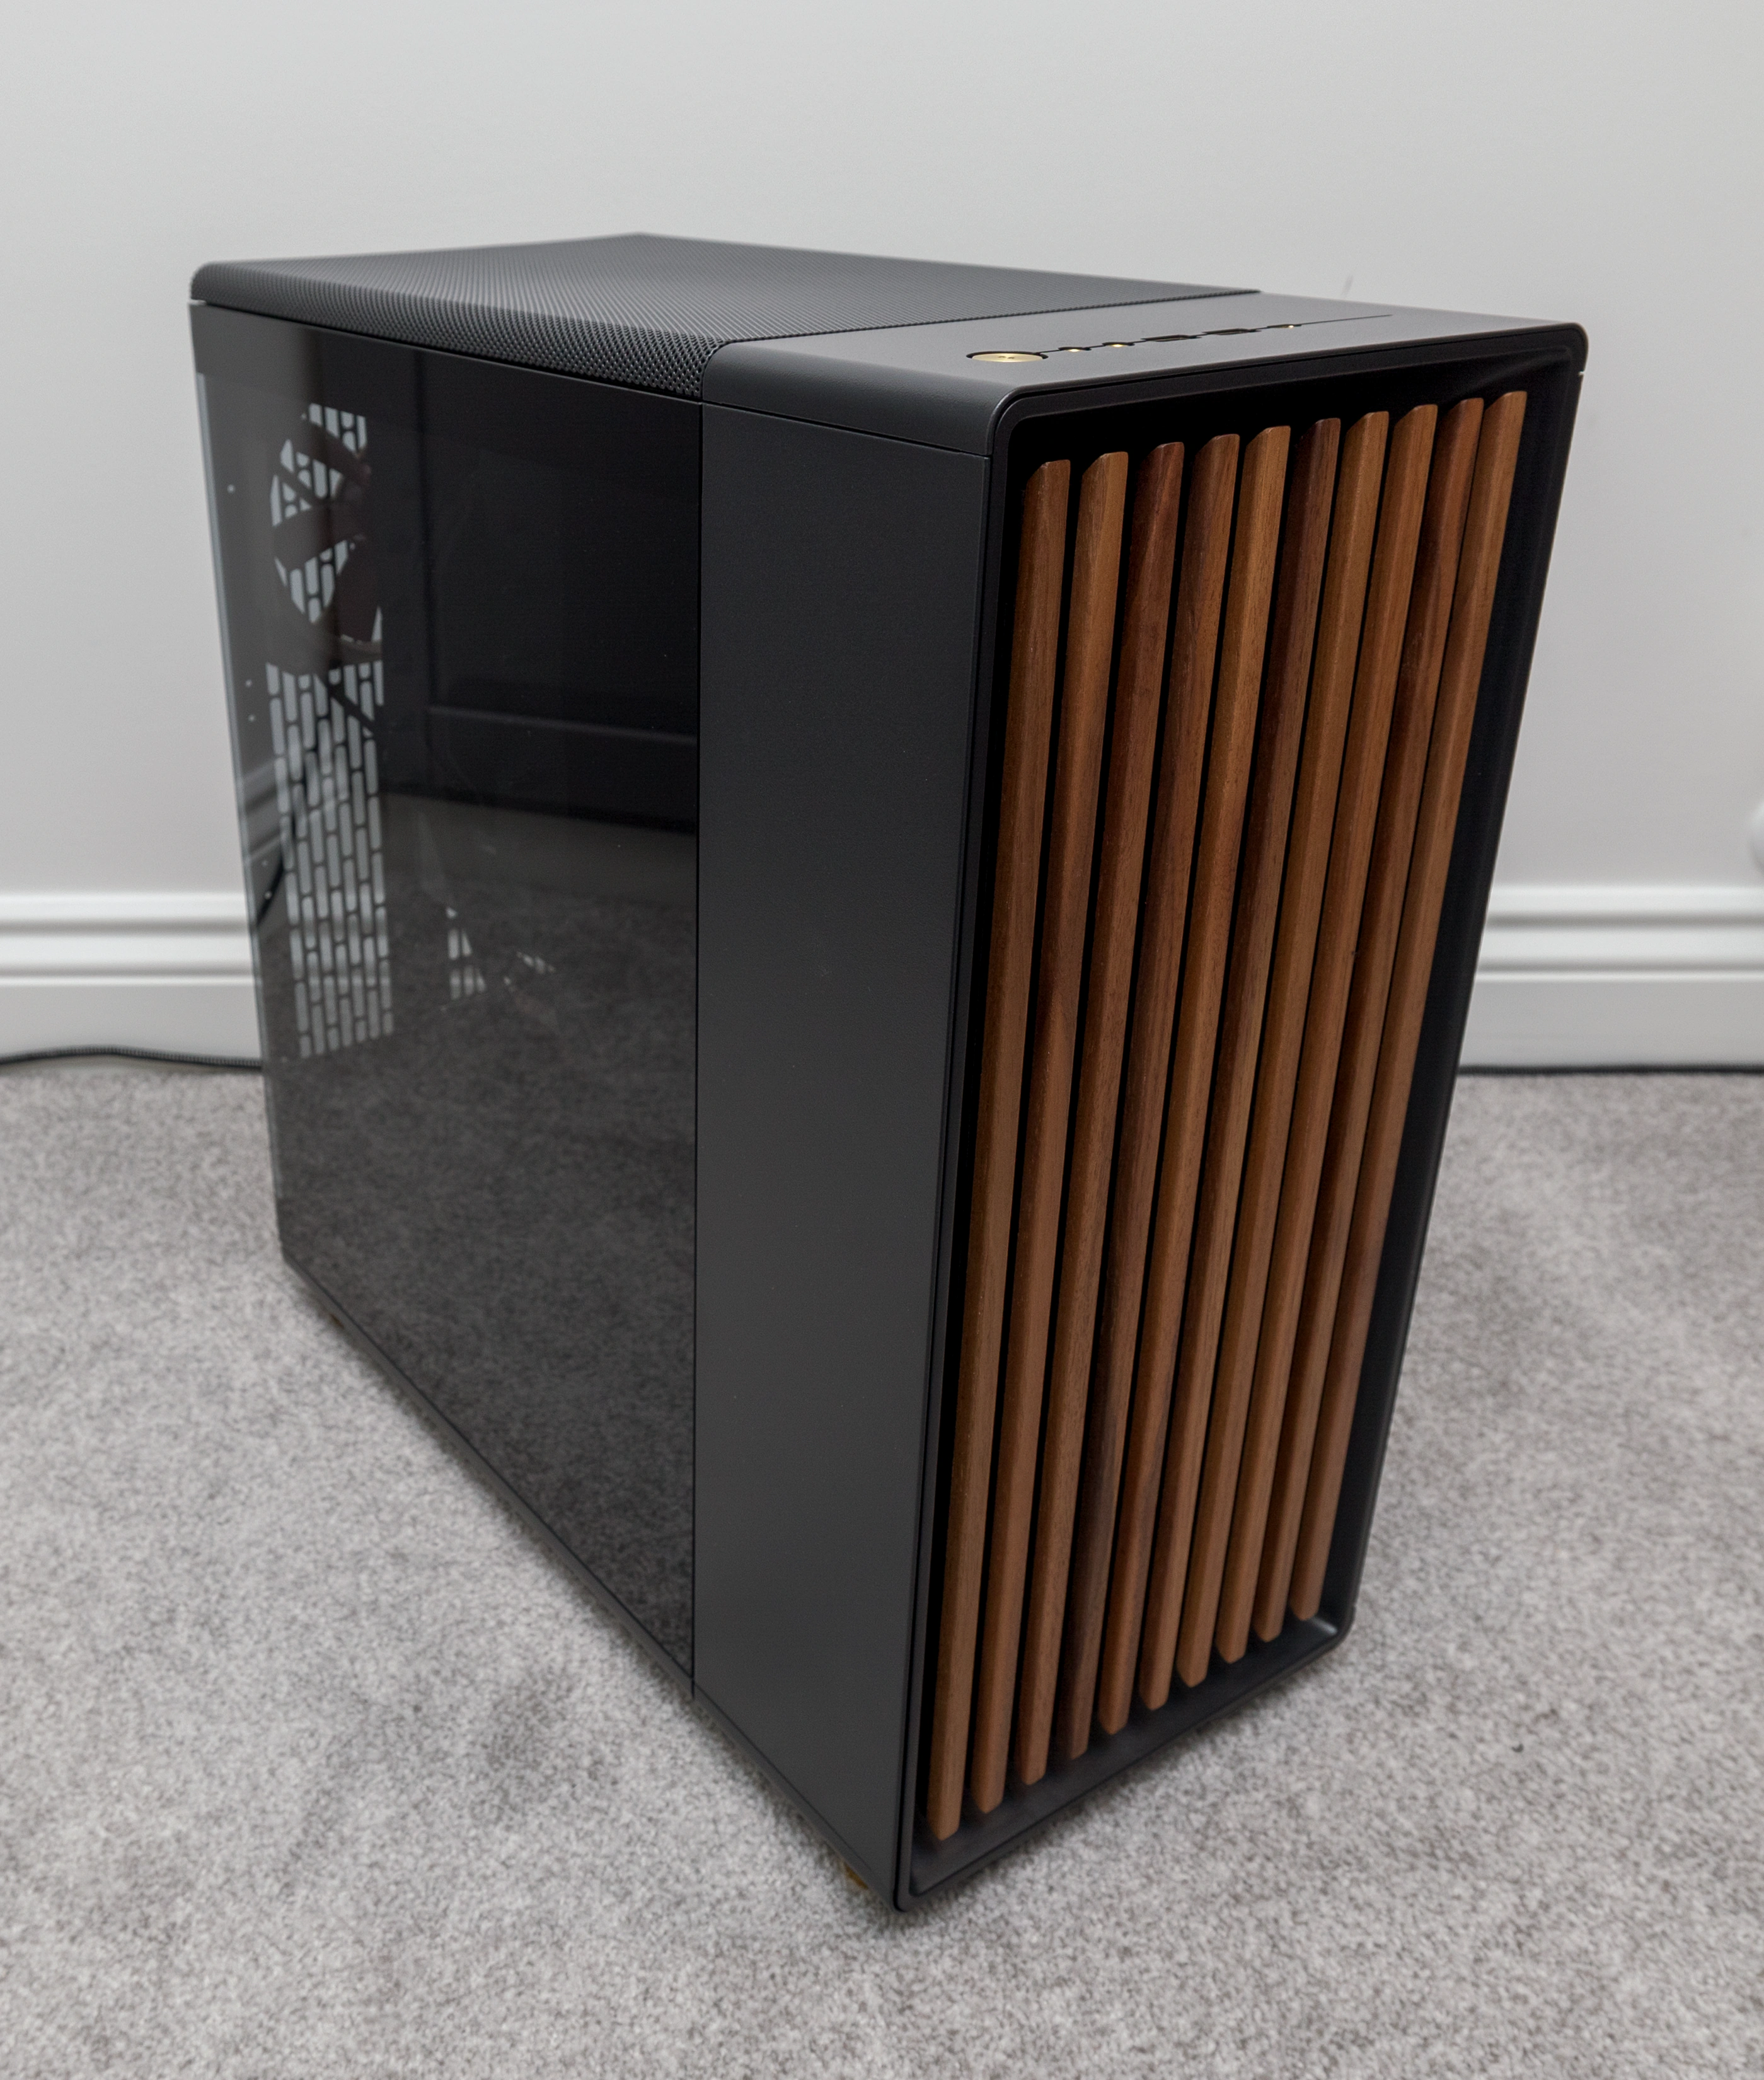
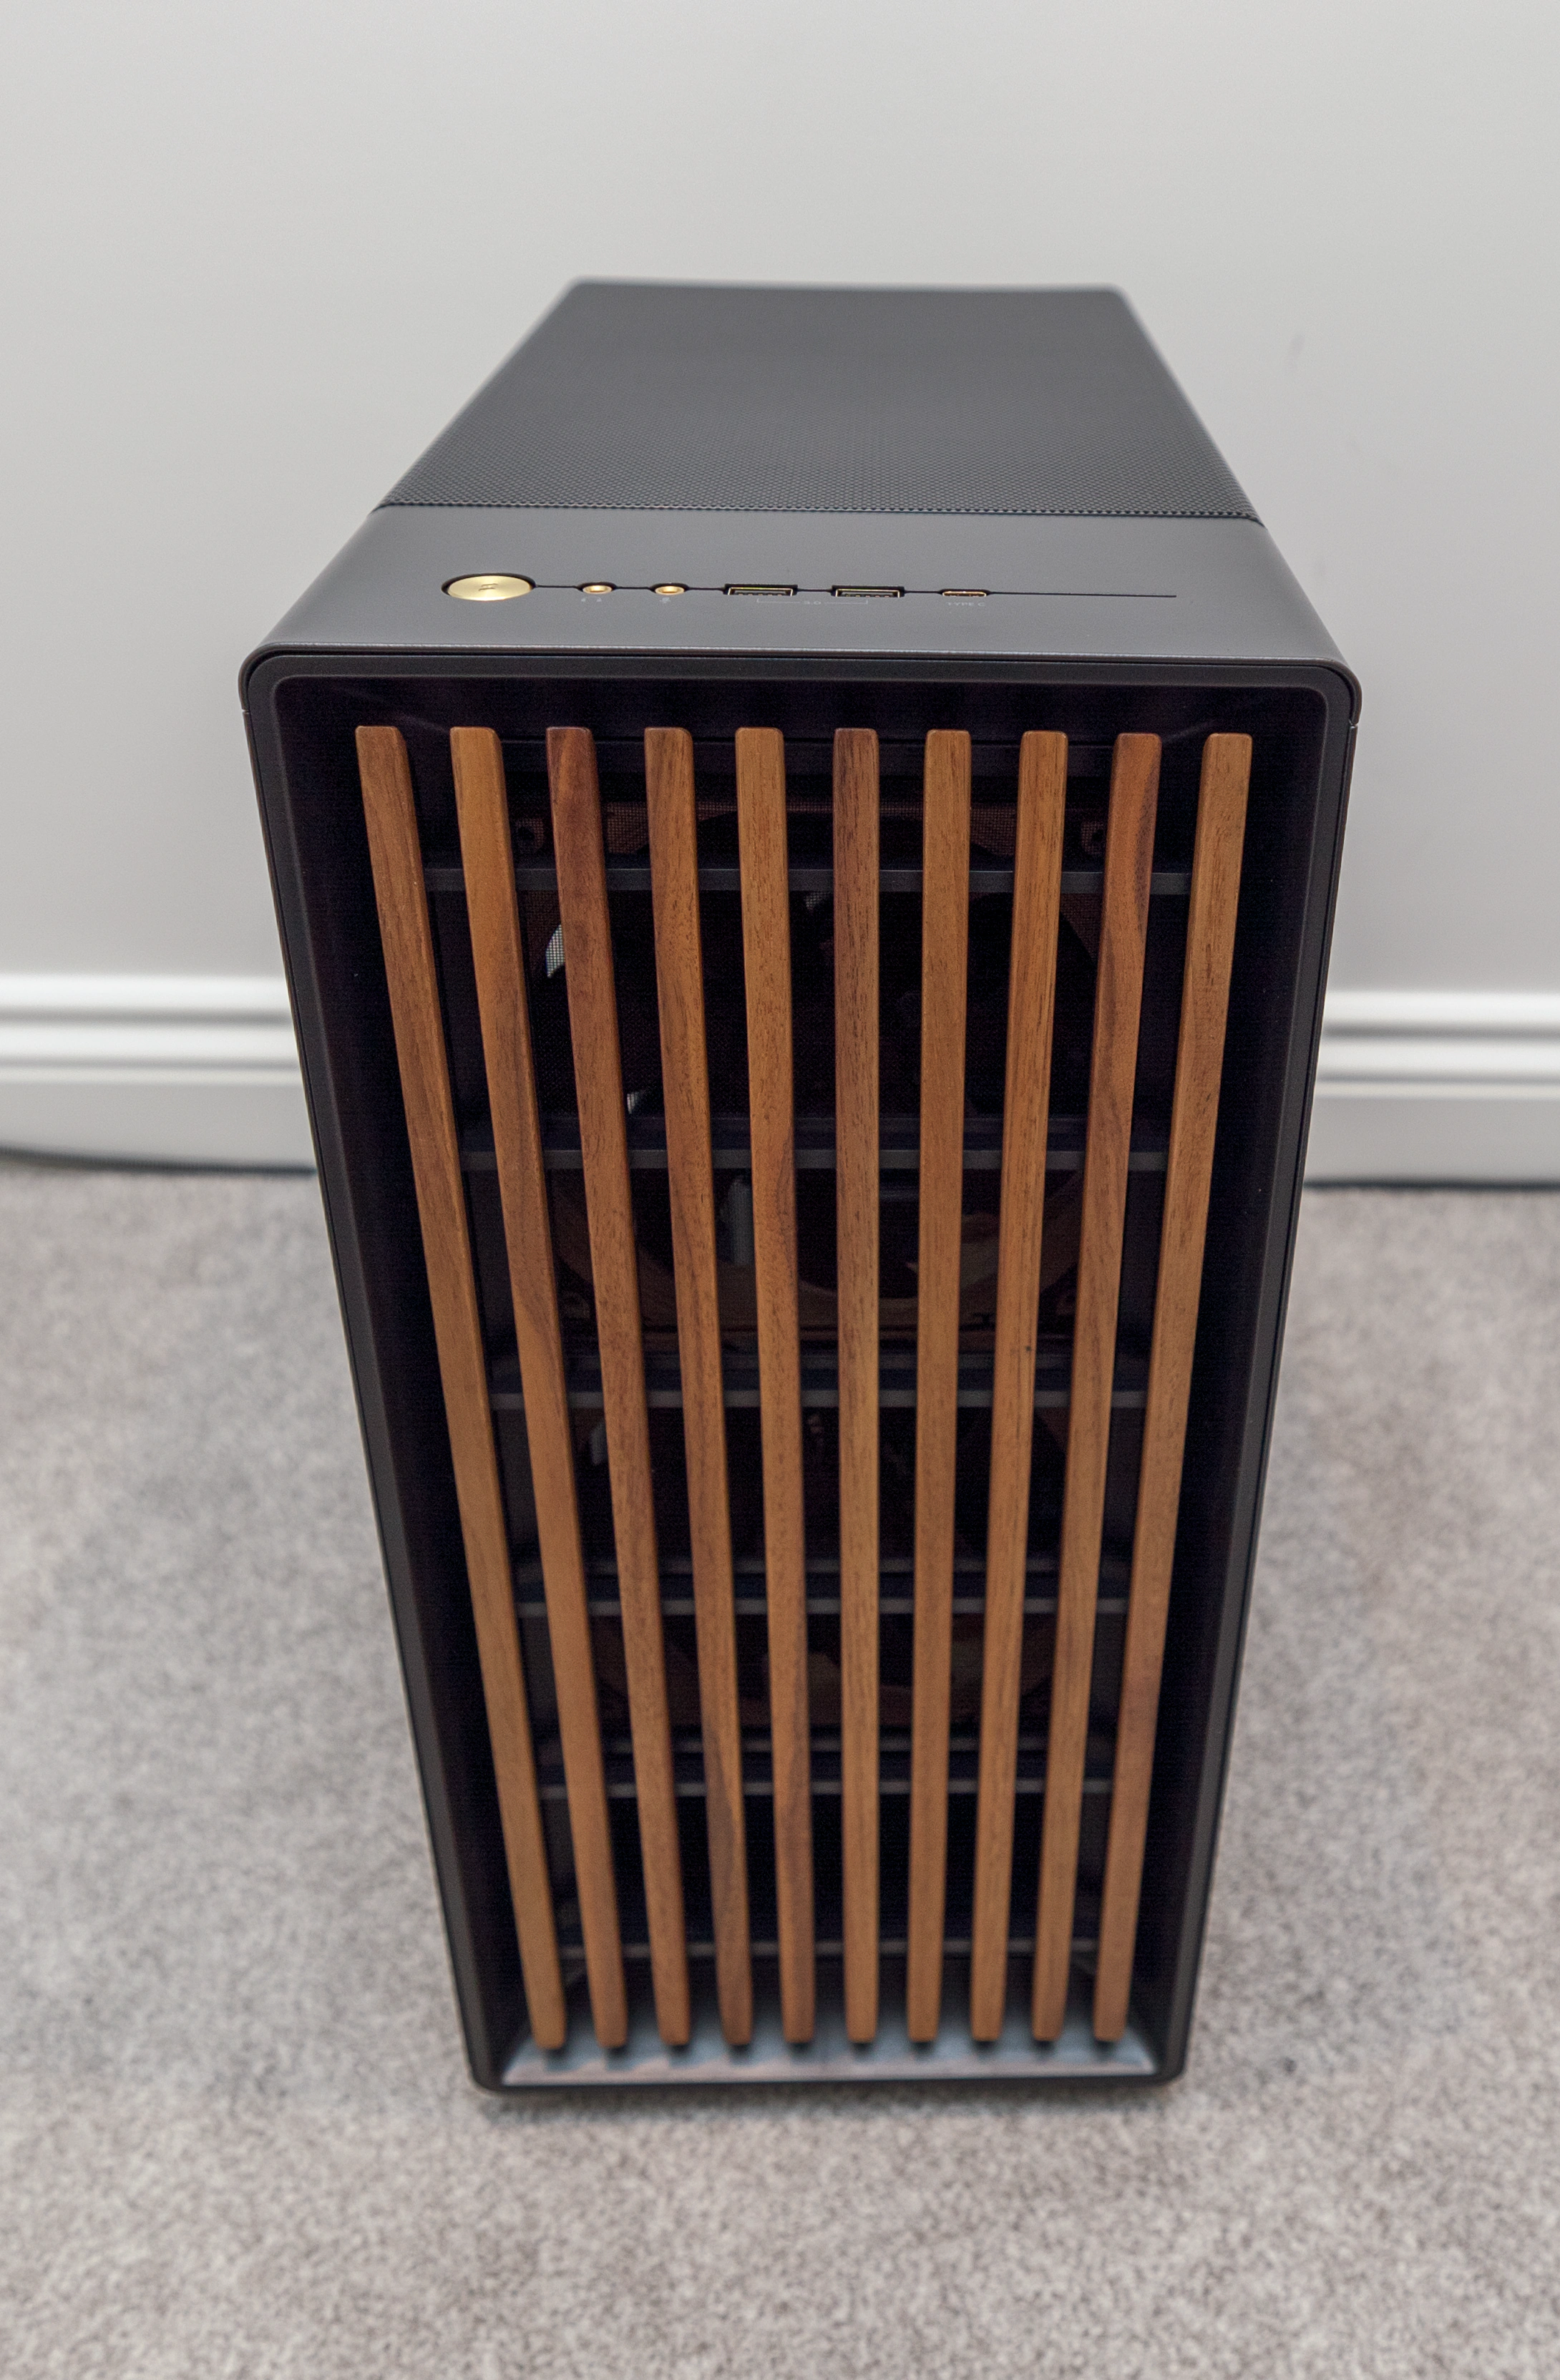
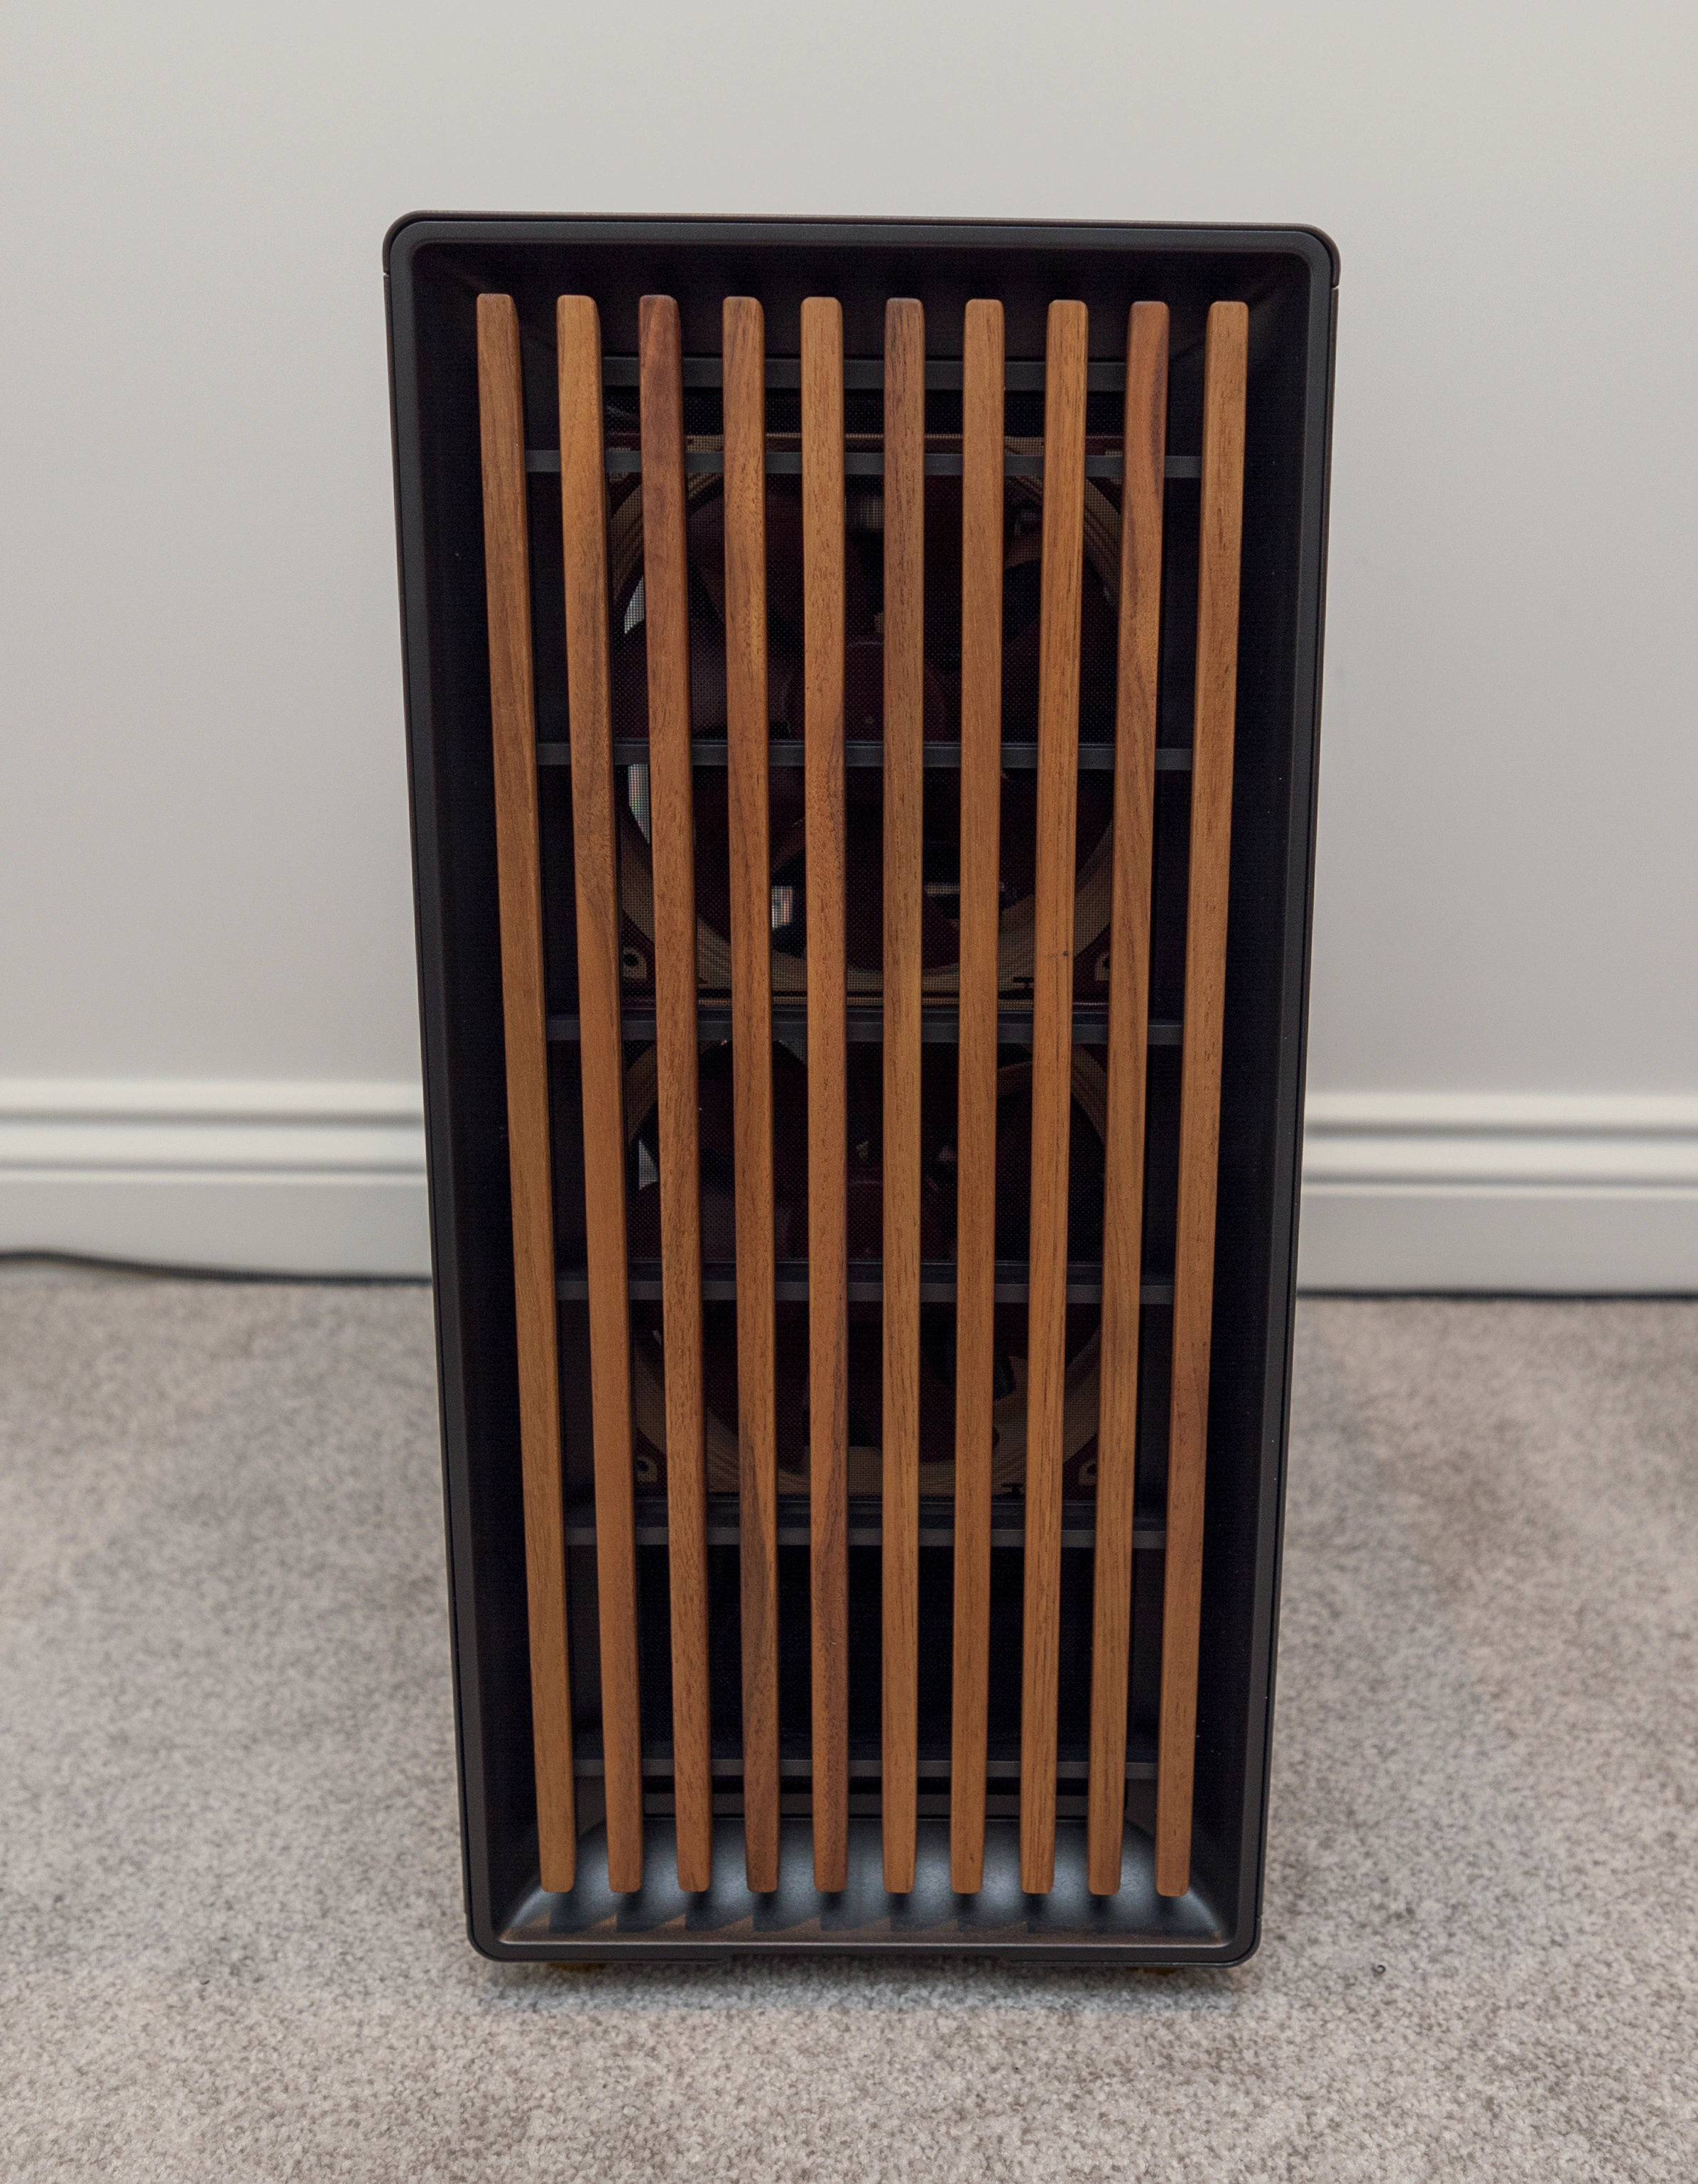
Fractal Design North Charcoal Black Tempered Glass
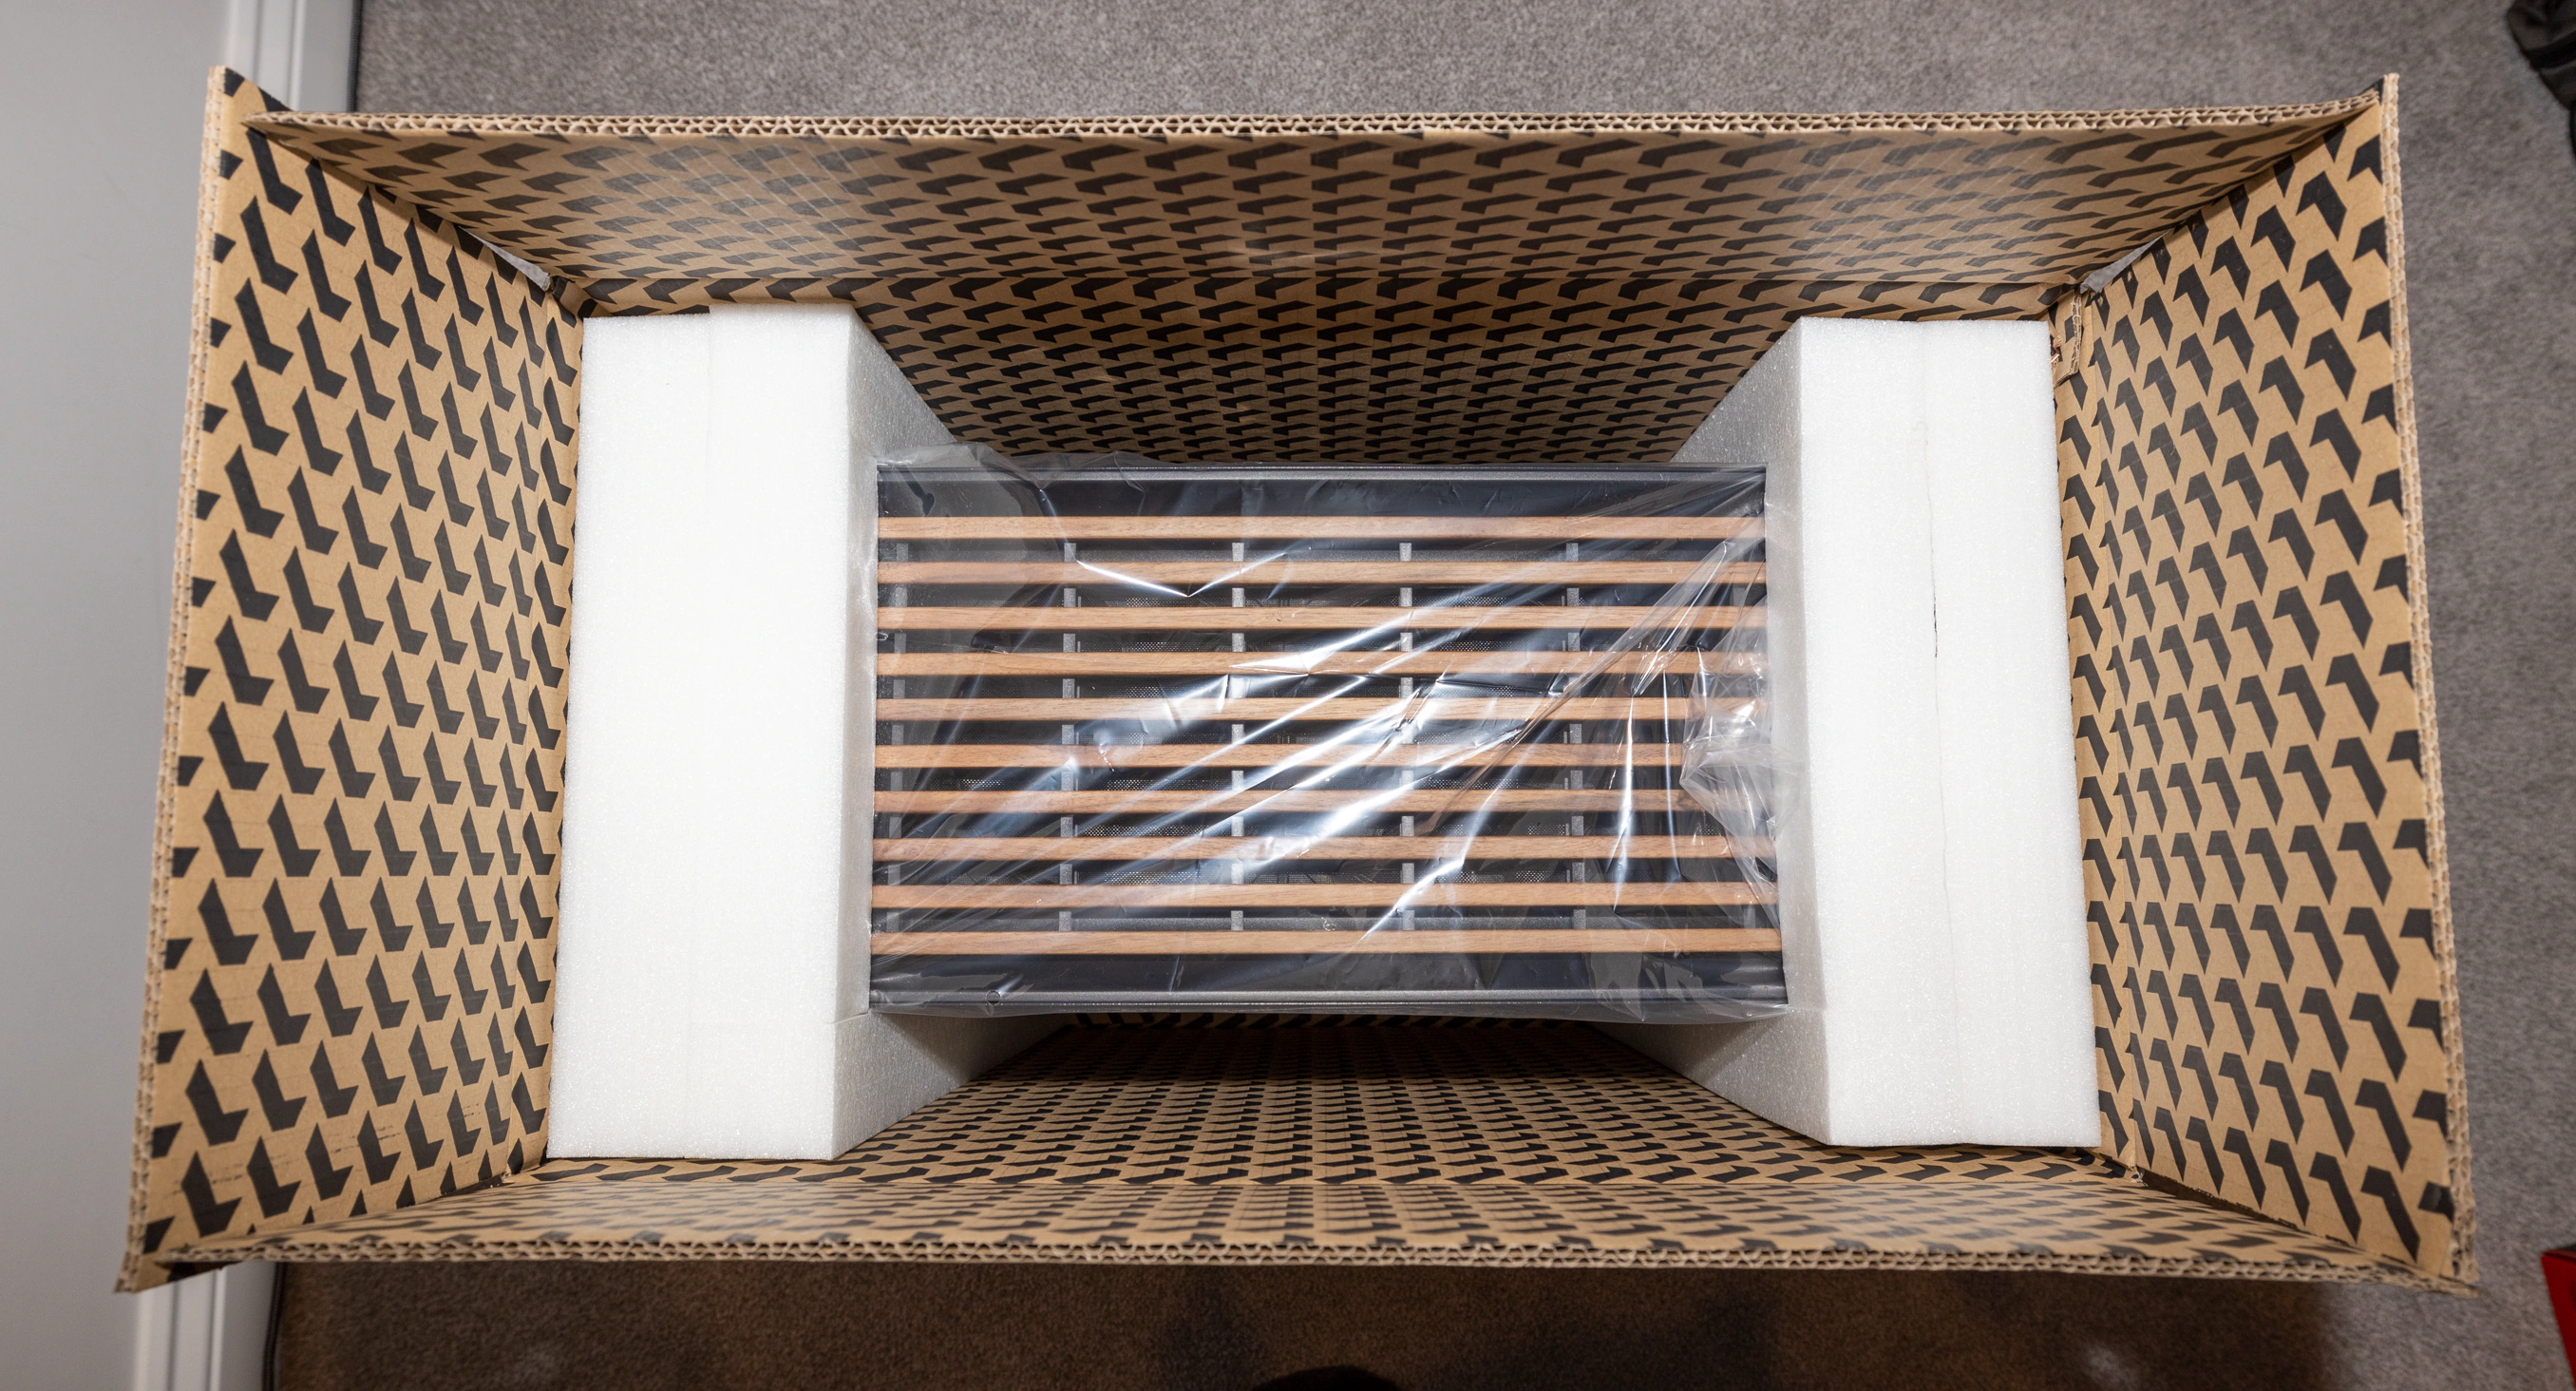
The Fractal Design North is a nice-looking case, and I saw it in stock so I jumped on it. I didn’t fancy having a mesh side (and I didn’t have room to install side fans anyway with the NH-D15S I bought), so I went for the tempered glass version.
The old parts
I kept these from my old computer:
- GeForce RTX 3070 Ti Founders Edition
- EVGA SuperNova 850W P2 PSU
- Samsung 980 PRO 2TB
- Samsung 970 EVO Plus 2TB
- Asus XG-100C 10 Gbps Ethernet card
- Two Noctua NF-A14 and one NF-S12A fans
The build
It took longer than I thought it would to assemble the tower. I did things roughly in this order:
- Install the motherboard in the case
- Install the CPU
- Install the cooler
- Install the RAM
- Install the PSU
- Swap out the front case fans
- Install a rear case fan
- (Turn on PC at this point and do some checks)
- Install M.2 cards
- Install graphics card
- Install network card
With hindsight, I’d have changed the front case fans first (more on that later).
My previous case was a Fractal Design Define R5. It didn’t have a separate PSU compartment (and is a bigger case), so it was a bit different installing things in this case. I also found the Noctua NH-D15S (with its asymmetric design) somewhat got in the way of the CPU power and fan connectors, making connecting those cables a bit fiddly (removing the top cover of the case helps here).
Installing a single-sided 2280 M.2 card in the top socket on the STRIX Z790-F was also a bit weird. You have to remove a pre-cut circle out of the bottom thermal pad (using whatever tool you have lying around to get it out) and stick a rubber plug in its place. The instructions could definitely be clearer here (and it’d probably have been easier to use one of the other M.2 sockets).
Here are some photos of the finished product:
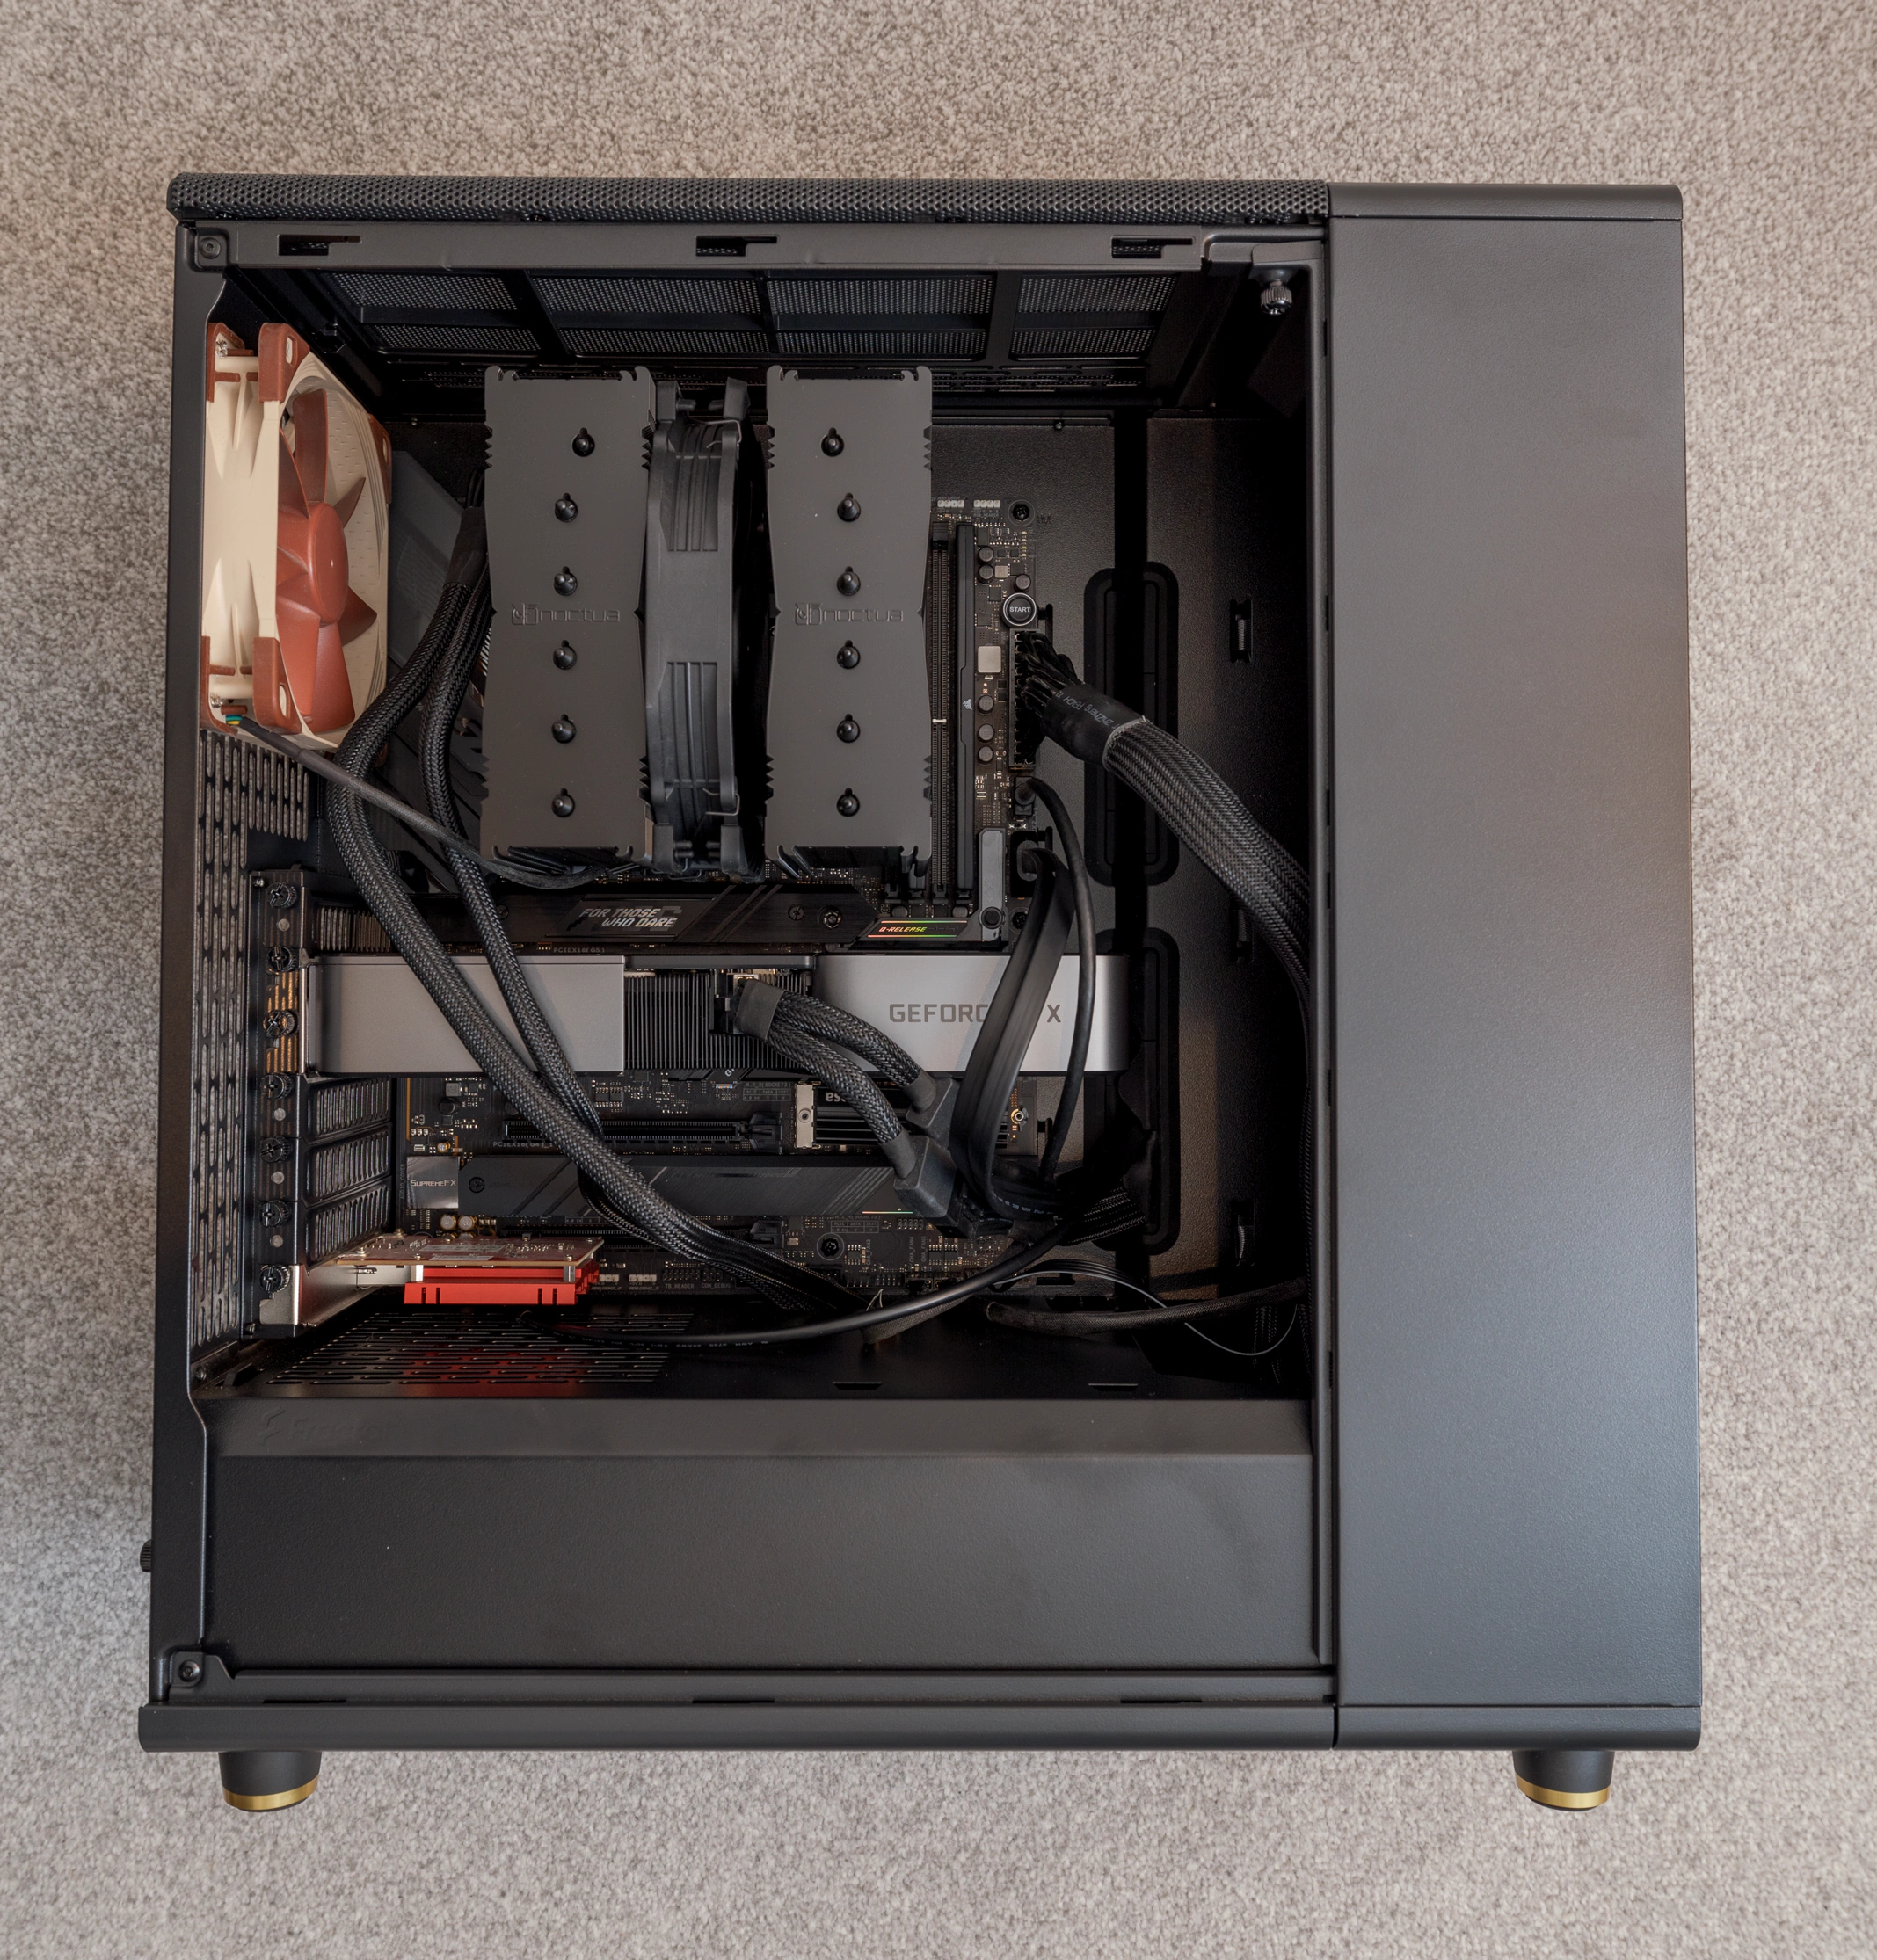
(I’ve since moved the rear chassis fan cable underneath the CPU power cables.)
What I don’t like about the case
There are a few things I don’t like about the Fractal Design North.
The layout of the front USB ports
They’re laid in a flat row, as they would be on a laptop. I’ve got a Sony MRW-S1 SD card reader, and when I plug it into one of the front USB-A ports, it blocks the other USB-A port. This didn’t happen on the Define R5, because the ports were rotated 90°.
Additionally, the USB-A ports on the North are rotated 180° to what I’d have expected. It means any flash drive I plug into them is facing away from me (along with its activity lights etc).
The power button
The power button on my Define R5 had a lot of travel. The one on the North is a hard, shallow click. It feels like it’s going to get stuck at some point.
How front case fans are mounted
If you install your front case fans the same way the pre-installed 140mm fans are installed, you have to screw them in from the inside. As I only went to do this after I installed the motherboard, space was tight. I also struggled to get the screws that were used on the pre-installed fans into my fans – I had much more luck with the screws that originally came with the Noctua fans.
On my previous Define R5 case, long fan screws were supplied so you could screw them in from the front. I don’t know why Fractal couldn’t have gone for a similar set up here.
Configuring the motherboard
The motherboard seemed to have sensible defaults for the most part (e.g. virtualisation on, Compatibility Support Module (CSM) off), meaning there were few configuration changes that I needed to do.
Asus, however, sets what it calls ASUS MultiCore Enhancement (MCE) to auto by default, with CPU power limits set to a very high value to effectively disable them (and rely on thermal limits instead). If you turn off MCE, the specced power limits for the CPU are used. For the i9-13900, that’s 65W for power limit 1 (PL1) amd 219W for power limit 2 (PL2), with a tau of 28 seconds. Roughly speaking, that means under load the power limit will boost to 219W for 28 seconds, before dropping down to 65W.
The only change I made initially was to enable XMP for my RAM. Asus gives you three options – XMP I, XMP II and XMP Tweaked. I went with XMP I (which has some extra Asus optimisations thrown in compared to XMP II), and ran MemTest86 to check things were stable. (Version 0904 of the BIOS includes MemTest86 10.0, but that’s a bit behind the latest version, and doesn’t actually include full Raptor Lake support.)
One other interesting thing in BIOS setup is that it scores your CPU silicon and cooling:
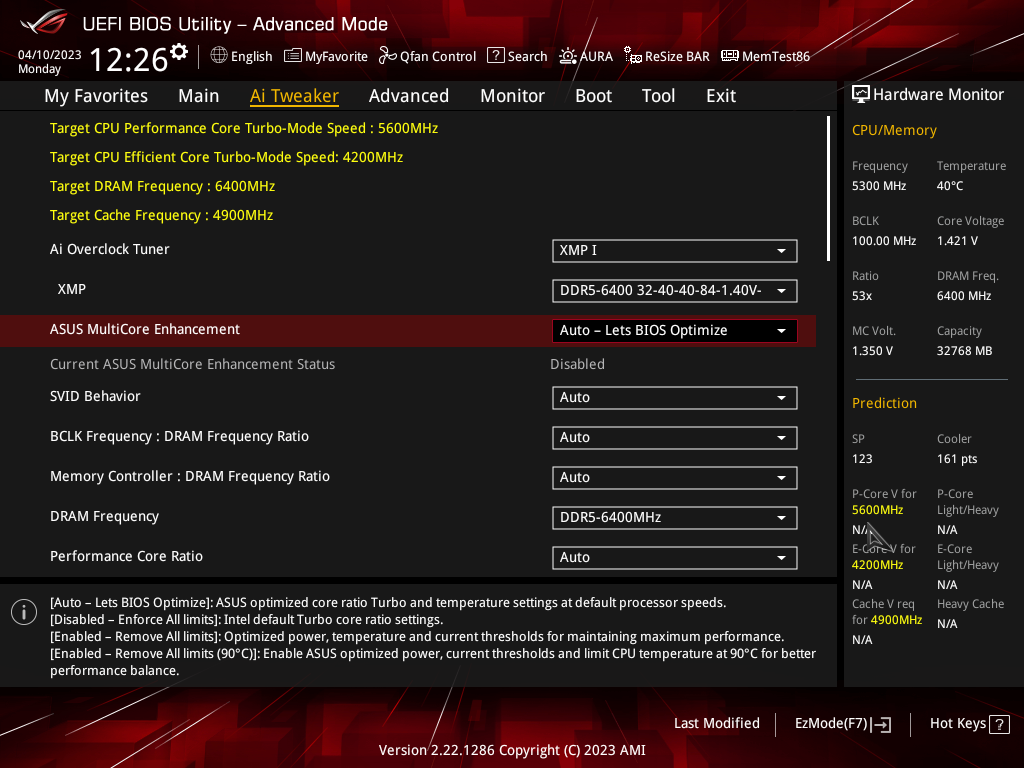
The silicon prediction (SP) score for my CPU is 123, which is on the high end from what I can see online. Unfortunately, I don’t have access to the screen that displays separate scores for the P- and E-cores. (It’s probably hidden unless you have an unlocked CPU.)
My cooler is given 161 points. I couldn’t work out whether that’s good or bad for an NH-D15S.
Benchmarks and measurements
I ran a few benchmarks to compare my new set-up to my old one.
Geekbench 6
Update – scores with Hyper-V off
The original benchmarks were run with Hyper-V on. Turning it off makes a notable difference to scores. Here are some updated numbers:
| Configuration | Single-core score | Multi-core score |
|---|---|---|
| MCE auto (PL1=4095) | 2997 | 20,448 |
| MCE auto (PL1=PL2=125W) | 2996 | 18,806 |
| MCE off (PL1=65W, PL2=219W, tau=28s) | 2993 | 20,190 |
| MCE auto (PL1=95W, PL2=150W, tau=56s) | 3007 | 19,395 |
These scores are the average of a couple of runs. What noticeable here is that:
- the power limits make no difference to the single-core score
- a 65W PL1 made little difference to the multi-core score. This is probably due to Geekbench not running long enough for the lower PL1 value to make a larger dent in the score
Average scores for most processor models can be found in the Geekbench processor charts. From those, you can see that my MCE auto (unlimited power limit) and MCE off scores are both better the Geekbench averages for the 13900 and 13900K. However, I wouldn’t read too much into that – the scores on the link are averaged across different configurations, meaning it’s not a like-for-like comparison with my set-up.
Original scores with Hyper-V on
These are the original scores I had, with Hyper-V on (except for my laptop).
| Configuration | Single-core score | Multi-core score |
|---|---|---|
| MCE auto (PL1=4095) | 2743 | 19,603 |
| MCE off (PL1=65W, PL2=219W, tau=28s) | 2748 | 19,364 |
| MCE off (PL1=95W, PL2=150W, tau=28s) | 2748 | 18,656 |
| My old PC (i7-8700K) | 1572 | 6646 |
| My laptop (Ryzen PRO 5850U, Hyper-V off) | 1885 | 7370 |
Cinebench R23
The single-core score of my 13900 is around 2205. Getting reliable multi-core scores is a bit of a pain due to run-to-run variability. But with PL1 and PL2 both set to 125W, it scores around 29,156. That is lower than scores elsewhere for the 13900K at 125W (ComputerBase give it 31,999 and AnandTech 31,615). I’m not sure what’s causing the difference here.
Update
Scores are slightly improved with Hyper-V off. At 125W, the single-core score is now 2209, and the multi-core score is 29,568.
Temperatures
After idling at the desktop for a few minutes, my CPU cores are around 31°C and the CPU package around 35°C.
With PL2 set to 150W, Prime95 blend mode pushes temps to around 60°C (in the period before PL1 kicks in).
With MCE set to auto, Prime95 blend mode pushes temps to the 80s. According to HWiNFO, some core thermal throttling sets in. It’s not clear to me if the CPU is being set to throttle at 90°C, or HWiNFO isn’t sampling frequently enough to catch higher temperatures. (For some reason, HWiNFO struggles to get frequent samples when the CPU is fully loaded.)
Idle power consumption
This was something it was hard to get good data on pre-purchase. My old 8700K set-up was idling at around 50W on the desktop, with frequent spikes into the 60s.
The new build is idling around 53W. That’s slightly higher (and a bit more if you account for that fact the old PC had two optical drives that the new one doesn’t). However, on the plus side, idle power consumption doesn’t spike up anywhere near as much as it did on my old PC.
Boot times
This was another topic that was hard to get good data on before committing cash.
With my old set-up, after a warm boot (i.e. turning the PC on without power loss) Windows Task Manager reported a ‘Last BIOS time’ of around 18 seconds. With my new one, it’s around 17 seconds. So, POST times are about the same (which is a bit of a relief).
Some other observations
My RTX 3070 Ti now has coil whine under heavy load
When running 3DMark, I noticed an odd noise coming from my GPU. It’s a loud, rattly whine that changes in pitch from time to time. At first, I thought it was one of the fans hitting something. But the noise is correlated with GPU load, and not fan speed, so it’s definitely not the fan. I can only surmise that it’s has started happening because the card is no longer being bottlenecked by the CPU.
And then there was a freeze
On the day after I completed the build, I was using Adobe Lightroom while playing music in the background. Suddenly, the display froze, but the music kept playing for another 10 seconds or so. The fans whirred up and the music stopped. There was no sign of life, so eventually I pressed the power button on my case and the computer immediately switched off.
Just a couple of hours earlier, I had turned on ‘Max Power Saving’ in my STRIX Z790-F’s BIOS to try and reduce idle power consumption further. This is a composite toggle that in turn toggles a whole load of other settings. Wondering if it was the culprit, when I turned my PC back on I immediately reverted that change. Once the PC had booted back up, I checked the Windows Event Log – there was nothing of interest there. There was, however, a new minidump file in C:\Windows\Minidump. It was a VIDEO_TDR_FAILURE. It suggests what happened was a blue screen of death, and I just couldn’t see it due to the frozen display output.
I’ve had several days of trouble-free operation since then, so I’m hopeful the power saving settings were indeed the culprit. (If they were, it’s hard to know who’s to blame forthe problem – I never touched those settings on my old motherboard.)
Wrapping up
I’m happy with my build at the moment. It’s a big step up from what I had, it’s quiet in daily use and it looks nice while taking up less space.